eBPF
Role
The eBPF module runs on Linux and rewrites packet-level values before they leave your machine. It works alongside STATIC to normalize the network-layer fingerprint that tools like p0f and nmap use for OS detection.
Overview
The eBPF module attaches to Linux Traffic Control (tc) egress hooks and rewrites packet-level values that can be used for passive OS and stack fingerprinting via tools like p0f or nmap.
Implementation
The eBPF layer complements STATIC.
Why both?
Mismatches between network fingerprints and higher-level browser identity can still expose the host as synthetic or misaligned traffic.
- STATIC handles TLS, HTTP, JavaScript injection, and control-plane behavior.
- The eBPF layer handles lower-level packet mutation on Linux inside the Rose-based distribution path.
On Windows, the managed desktop product path reaches this Linux layer by booting the 404 distribution through WSL2.
On CLI-managed Linux paths, you can build and attach it directly yourself.
Kernel and toolchain requirements
You need a Linux environment with:
- Linux kernel
4.15+(5.4+recommended) clangllvmllvm-striptciproute2libbpf-devlinux-headers-$(uname -r)/usr/include/bpf/bpf_helpers.h/usr/include/linux/bpf.h
Configuration
Packet behavior now has a live profile-driven path on Linux.
The current Linux packet-profile model is:
- the Linux boot path pins the
fingerprint_profilesBPF map - STATIC derives a packet profile from the selected profile JSON
- the active packet profile is written into the pinned map
- the eBPF classifier reads from that map and falls back to built-in defaults only when no userspace value is present
You can still inspect and modify the kernel-side code directly if you are developing the packet layer, but normal packet behavior is no longer limited to compile-time globals.
Native OS Options:
| OS | TTL | Window Size | Window Scale | ISN | MSS* | Timestamps | TCP Option Order |
|---|---|---|---|---|---|---|---|
| Windows | 128 | 64 kb (64240 bytes) | 8 | Randomized | Varies based on connection | Not used | MSS,NOP,WS,NOP,NOP,SACK |
| MacOS | 64 | 64 kb (65535 bytes) | 6 | Randomized | Varies based on connection | Internal counter | MSS,NOP,WS,NOP,NOP,TS,SACK,EOL |
| Linux | 64 | 64 kb (65535 bytes - 5840 bytes for 2.4/2.6 kernels) | 7 | Randomized | Varies based on connection | Internal counter - sometimes randomized | MSS,SACK,TS,NOP,WS |
1. Open ttl_editor.c and modify the #define values at the top: (optional)
#define FORCE_TTL 255
#define SPOOF_TCP_WINDOW_SIZE 65535
#define SPOOF_TCP_MSS 1460
#define SPOOF_TCP_WINDOW_SCALE 5
// etc.
Current Linux packet-profile model
The selected profile can now drive the active packet profile on Linux through the pinned BPF map path.
Default Implementation Options
IPv4:
- TTL (Time To Live) → forced to 255
- TOS (Type of Service) → set to 0x10
- IP ID (Identification) → randomized per packet
- TCP window size → 65535
- TCP initial sequence number → randomized (again)
- TCP window scale → 5
- TCP MSS (Maximum Segment Size) → 1460
- TCP timestamps → randomized
IPv6:
- Hop limit → forced to 255
- Flow label → randomized
- TCP parameters (same as IPv4)
Build path
The Makefile in src/ebpf builds:
ttl_editor.o
Typical local invocation:
You can also build it from inside the directory directly:
This is the same object that is packaged into the Rose-based distribution build path.
For a CI-shaped local loop that builds STATIC, compiles the eBPF object, and packages a WSL-importable distro tarball in one command, use:
Attach path
Attach:
sudo tc qdisc add dev <interface> clsact
sudo tc filter add dev <interface> egress bpf da obj ttl_editor.o sec classifier
Remove:
For a repo-managed attach flow that mounts bpffs, discovers live eth* interfaces, attaches the classifier, and pins fingerprint_profiles, use:
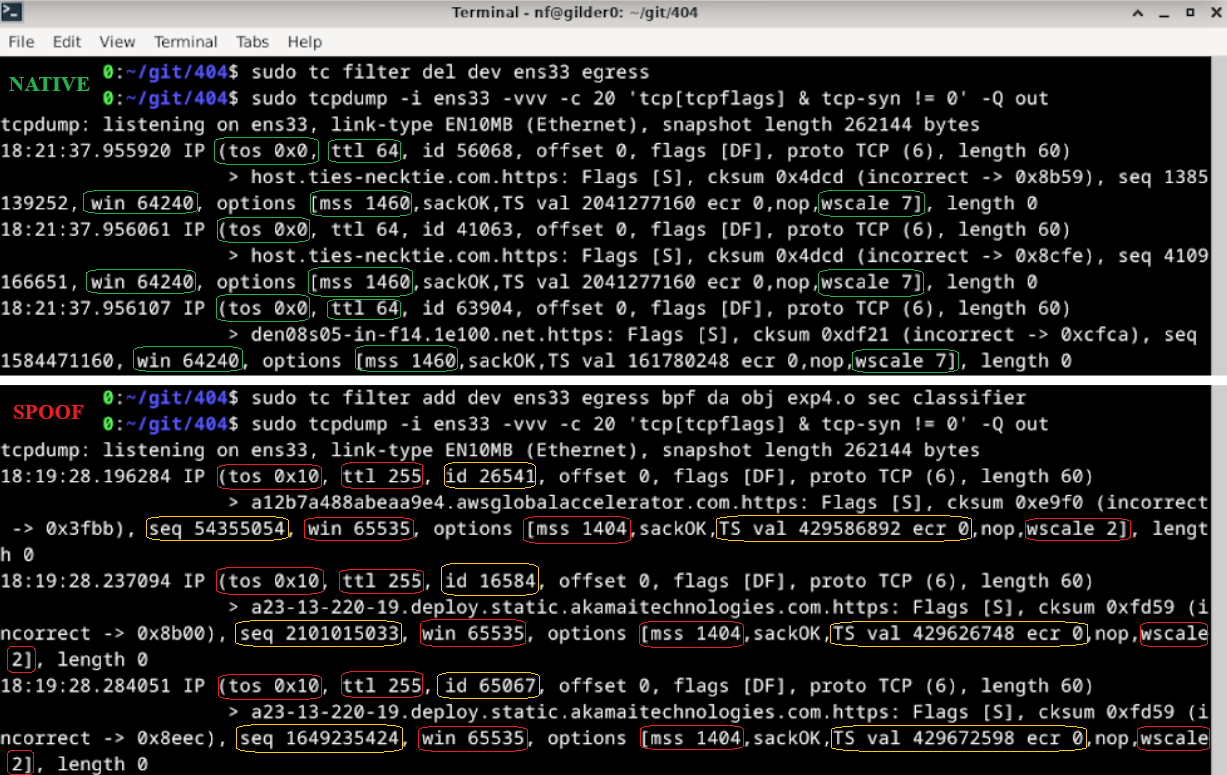
Verify and inspect
Verify attachment:
Inspect outgoing traffic:
tcpdump -i <interface> -vvv -Q out
tcpdump -i <interface> -vvv -c 20 -Q out 'tcp[tcpflags] & tcp-syn != 0'
tcpdump -i <interface> -vvv -nn -Q out | grep -E 'ttl|win|mss|wscale'
tcpdump -i <interface> -vvv -XX -Q out
tcpdump -i <interface> -vvv -Q out port 443
Useful helper scripts:
scripts/inspect-ebpf-state.shprints the routed egress path, attachedeth*interfaces, pinned packet profile map, decoded active profile, and protocol counters.scripts/tcpdump-syn-fingerprint.shauto-detects the routed interface and captures outbound SYN packets with decoded TTL, window, MSS, window scale, and option ordering.scripts/run-static-with-ebpf-caps.shbuilds STATIC and runs it with the capabilities needed for pinned-map sync, including WSL-safesudofallback.
Examples:
bash ./scripts/inspect-ebpf-state.sh
bash ./scripts/tcpdump-syn-fingerprint.sh --host 1.1.1.1 --count 10
bash ./scripts/run-static-with-ebpf-caps.sh --profile firefox-windows
VM forwarding
If you want to expose a host machine through a Linux VM that is running the packet layer, use a bridged adapter for internet access and a host-only adapter between the host and guest.
On the Linux guest, enable IPv4 and IPv6 forwarding and apply the normal forwarding and NAT rules for the host-only and bridged interfaces.
sudo sysctl -w net.ipv4.ip_forward=1
echo "net.ipv4.ip_forward=1" | sudo tee -a /etc/sysctl.conf
sudo sysctl -w net.ipv6.conf.all.forwarding=1
echo "net.ipv6.conf.all.forwarding=1" | sudo tee -a /etc/sysctl.conf

sudo iptables -A FORWARD -i <host-only-interface> -j ACCEPT
sudo iptables -A FORWARD -o <host-only-interface> -j ACCEPT
sudo ip6tables -A FORWARD -i <host-only-interface> -j ACCEPT
sudo ip6tables -A FORWARD -o <host-only-interface> -j ACCEPT

sudo iptables -t nat -A POSTROUTING -o <bridged-interface> -j MASQUERADE
sudo ip6tables -t nat -A POSTROUTING -o <bridged-interface> -j MASQUERADE
On the host, point the default route at the guest's host-only adapter IP.